
Cinema 4D Lighting and Render Tutorial
13 Apr, 201814 min read
 Final Render Image in Cinema 4D for this Tutorial
Follow this tutorial step-by-step to improve your understanding of lighting and rendering techniques that you can use in graphic design, illustration and video games projects in Cinema 4D.
STEP 1: Setting up the Cinema 4D's Scene
First of all, open Cinema 4D. Then, go to "Edit Render Settings" (Ctrl + B). And on the combobox at the top-left called "Renderer" switch from Standard to Physical.
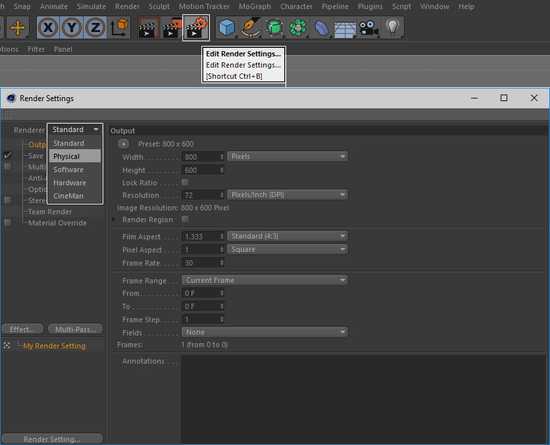
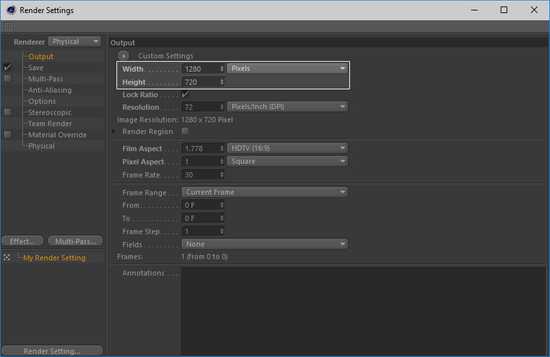
Before you close this window, let's change the size of the render. Select the first option in the sidebar called "Output". Here you can set the width and height to whatever you want or need. I am going to set it to 1280 x 720 pixels.
STEP 2: Making a Composition
Now, we need a 3D model to illuminate. To speed things up, I opened the "Content Browser", that you can find under Window > Content Browser, or with the shortcut Shift + F8, and I browsed for some models to put into the scene.
Notice that I have removed any materials that were included in the original model, and I replaced them with Cinema 4D's default material. Also, do not forget to make a floor and to add the same standard material to it.

After you are happy with the 3D model you have put in the scene, add a camera and search for an angle that you like. Note that I have added a "Protection Tag" to the camera, so I can test the lights effectively without accidental changes to the view. To do so, right-click in your camera and go to CINEMA 4D > Protection. This tag will block the camera's position, size and rotation.

STEP 3: Overviewing the Concepts
Before we get to the illuminating part of the tutorial, let's see how this simple scene would look with and without Global Illumination turned on.
 Standard Render in Cinema 4D
Firstly, this is how the scene looks if we only hit render. Important concepts to have in mind: all real-life objects, even the most rough ones, reflect on some level the colors from their surroundings. In the same way, all real-life lights have color and it is shown in the objects they fall in. The render above stresses the lack of these concepts. For example, there is no color gradient on the surfaces: it goes from a light-grey to black.
We can look at 3D rendering applications, such as Cinema 4D, as simulators of real light and physics. Nonetheless, computers are not as accurate nor as proficient in doing 100% real-world simulations. When real-life light hits a surface, it bounces from one surface to another. With each bounce, the light gets a little bit weaker and weaker until all of it is gone. These bounces are what gets the light properly reflected from a diverse number of surfaces, and consecutively, it gives more depth to our surroundings. The following image portrays a simplified simulation of this phenomena:
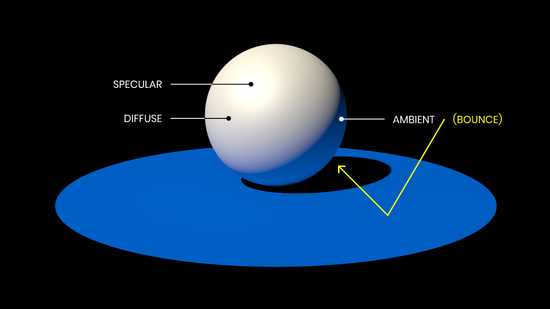 Simplified Simulation of the Bounces of Light
Now, the number of bounces that happen can be immense and take massive computing power to calculate. This is why both 3D software engineers as well as 3D artists, have to come up with different strategies and techniques that help overcome these limitations and get a desirable final image.
Global Illumination and Additional Render Engines in Cinema 4D:
Cinema 4D, and many other rendering applications, include a set of algorithms that help us with this constraint. For example, most 3D renderers have an option called Global Illumination (shortened as G.I.). How these algorithms function is well beyond the scope of this article, but what you should know is that these calculations simulate some of the bounces that occur with real light. Overall, G.I. achieves a more realistic look for the final image. Nevertheless, the improper or sole use of this feature tends to generate a collection of dull renders.
Naturally, another topic that has to be mentioned is additional rendering engines, such as Arnold, Octane and V-Ray. Basically, they are more accurate and faster 3D renderers. Luckily, in 2011, Maxon implemented its Physical Render engine that is similar to the previously mentioned (but probably not as powerful). However, these additional rendering engines can get somewhat expensive, so one of the upsides of the Physical Render engine is: it is already included in Cinema 4D! (from R13 and up).
If you want to see more about what render engine you should choose, take a look at GreyScaleGorilla's Post.
Or do you want to compare the Standard Render engine with the Physical one? Check out this Video to know more about them.
Let us now look at a simple render made with a HDR image and with Global Illumination turned on:
 Global Illumination + HDR image Render
This render looks more depthful but it still looks monotonous. The object now has a blue color that comes from the HDR lighting, which gives some color gradient to the surfaces. However, something the last render has, but this one lacks is a more noticeable value gradient. It is important to get some kind of specular, or highlights, on our renders: they help us making a more appealing image, one that has more contrast and depth.
Furthermore, a big problem I have with the renders that seem to only have G.I. turned on is their shadows. On this render they do not look as terrible as others, but still the object looks floating above the ground, it does not look well placed.
 Global Illumination + Physical Sky Render
A very nice thing that was added in Cinema 4D R11 is the Physical Sky shader, which is a very nice way to get a fast realistic sky and ambient into the renders. Nonetheless, if it is used as the whole light setup, we will get the same dull results as before. Of course, the value gradient is better and the light also has color (but only one). Another nice thing it has, in comparison with the past render, are the shadows: they now seem in place, with a gradient between hard and soft edged shadows, and the model does not look to be floating anymore.
STEP 4: Setting up the Three-Point Lighting Technique in Cinema 4D
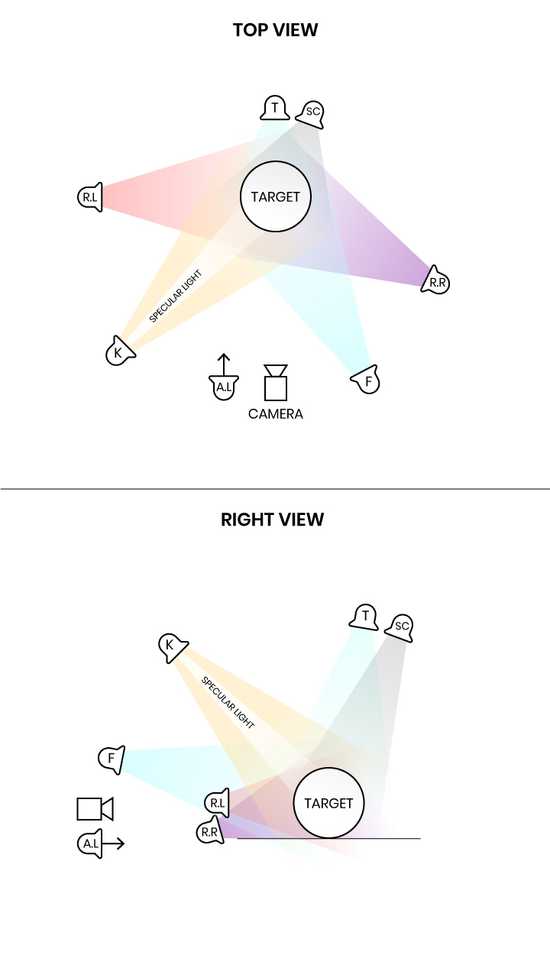
Photographers are a great example of light manipulation and we, as 3D artists, can learn a lot from them. Now, this is another plus for the Physical Render engine: it is based on real-world cameras, so if you understand concepts like Aperture, ISO and Shutter Speed you already have a solid knowledge base. These are used mostly when you want to add Depth of Field or Motion Blur into your image. I am not going to explain thoroughly this technique as there are many other articles explaining it, but here is a simple graphic that portrays the lights' positions:
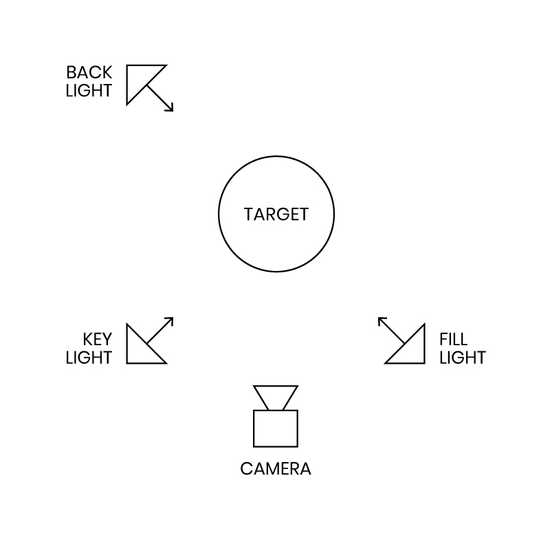 Three-Point Lighting Technique Infographic
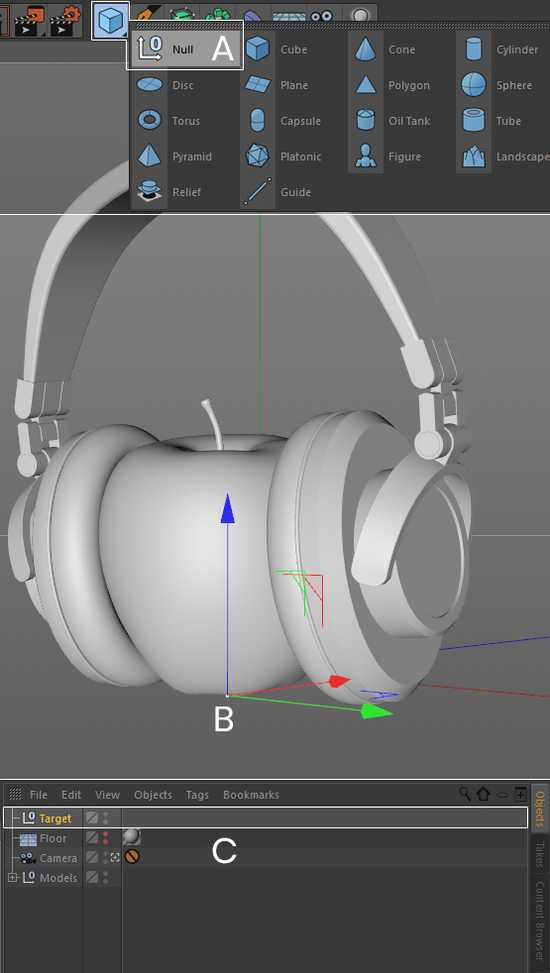
Now, let's recreate the Three-Point Lighting technique in Cinema 4D. First, we shall add a Null Object (A). Then, position it in the middle of the desired object to be illuminated (B), and lastly, change its name to "Target" (C). As its name states, this Null Object will help us to direct and align the "rays" of light to the model we want to render, as well as to provide us an easy and quick way to make adjustments to the overall lighting.
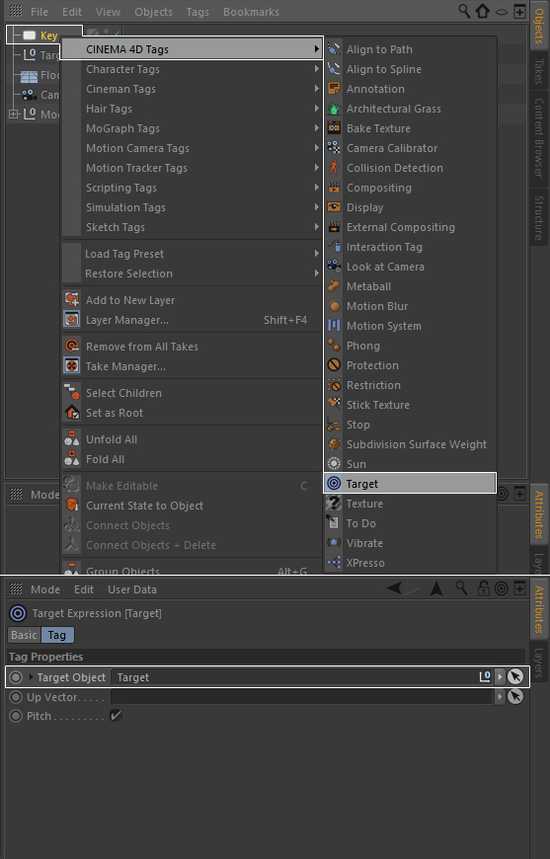
Once the Target object is added, let us add one Area light, this will be our Key light. We can refer to this light as the main light. Change its name to "Key". Before we position it, we have to link it with the Target object, so right-click on the recently added light and go to CINEMA 4D Tags > Target. Now, select the tag and within the Attributes panel set the "Target Object" to the Null Object named "Target" we created before.
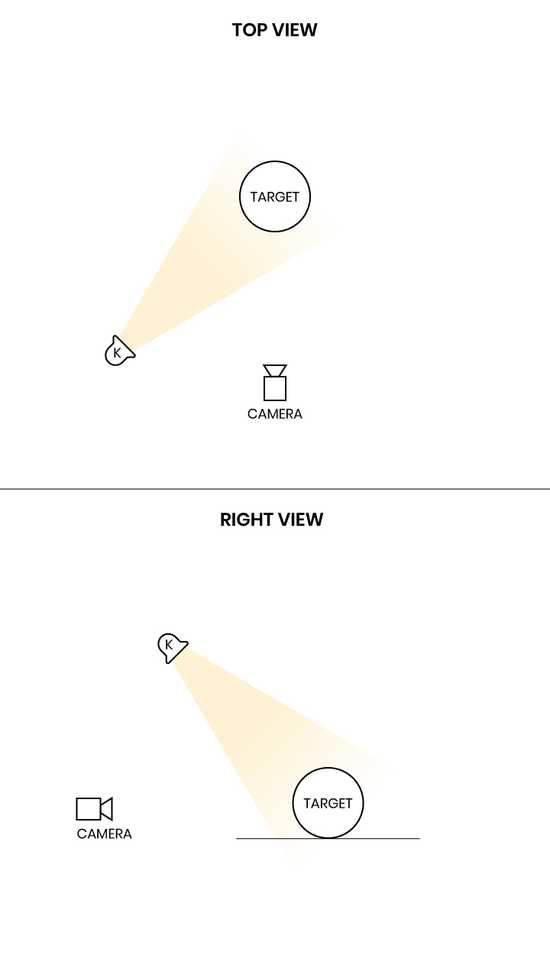
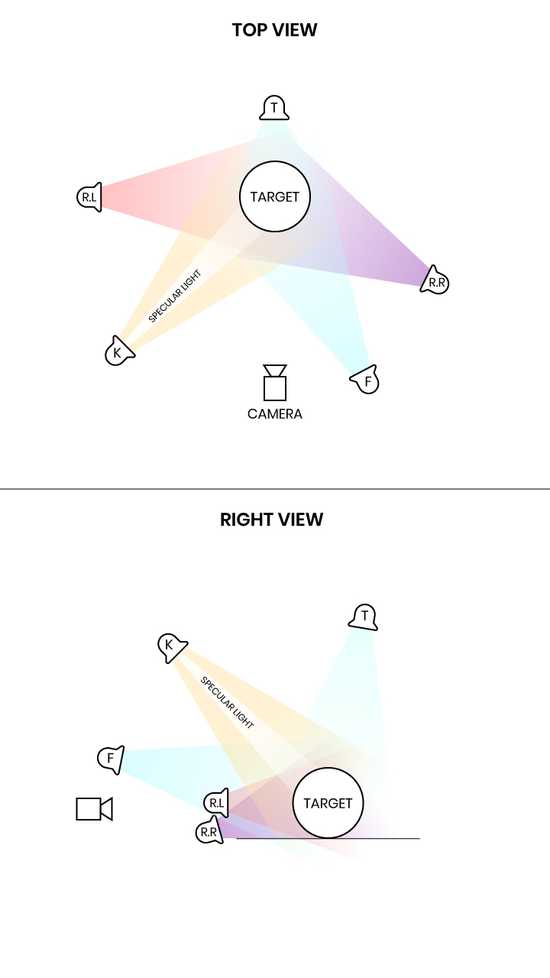
When this is done, we have to position it. Normally, in photography, the Key light is positioned to one of the sides of the object, as well as above it. For easy viewing, I have shortened the name "Key" to "K" in the following graphic:
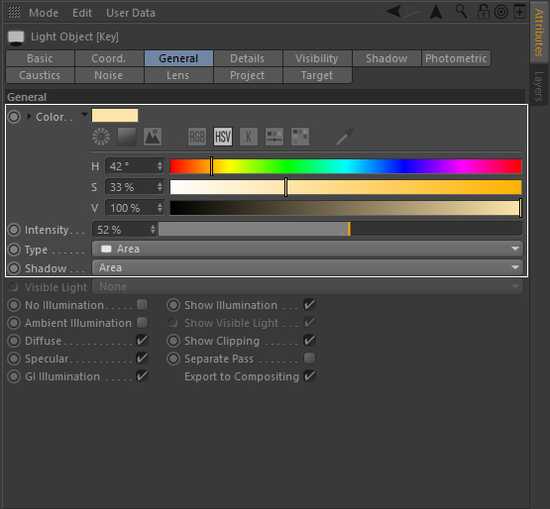
After positioning the first light, let's go check out its parameters. It is good to keep in mind that a good reference of lighting is nature itself. For example, we can take the sun as our Key light and the sky as our other lights (these will be reviewed afterwards). With this being said, we can "copy" nature's colors and set our Key light to a light-yellow. Lastly, the other two parameters we should change are the Intensity and the Shadow type.
For the Intensity, I chose 52%, but keep in mind that these values can change later when you play around with your setup. For the shadows, the Area Shadows are the best option in Cinema 4D as they have got more edge gradient and depth than Soft or Hard shadows.
A good piece of advice is to test each light separately. Although we only have one light in our scene, it is preferable to see how this individual light affects our object:

Nothing fancy, but it is a beginning. We need more lights to brighten up the dark shadows of the object. Let's continue with the Three-Point Lighting technique, and create two more lights. The first one to add can be the Fill light (F), just copy and paste the Key light so we do not have to change its Attributes again. The Fill light does exaclty what its name implies: to fill up the scene, particularly, the dark shadows.
The Fill light generally is in the opposite part from the Key light, where the strongest shadows will be. Therefore, in the lower right part of the object:
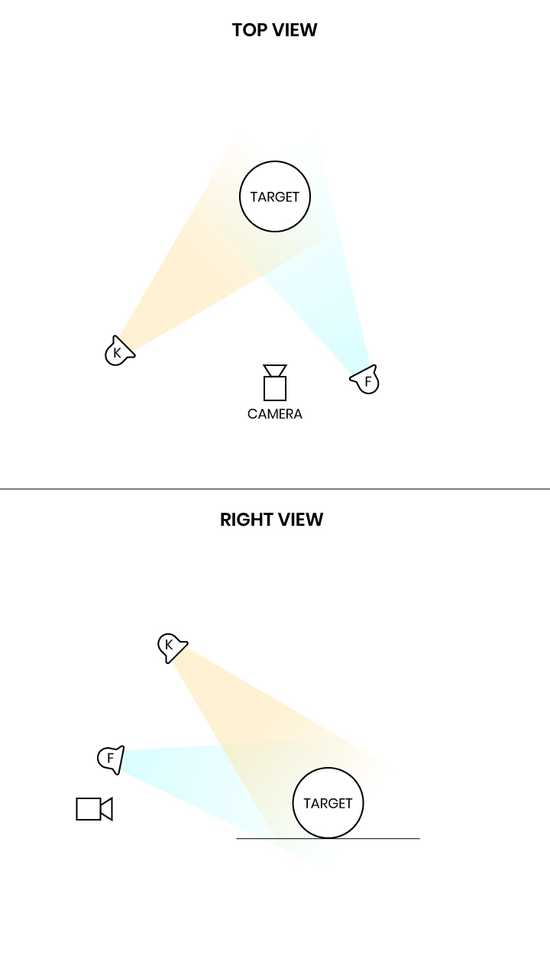
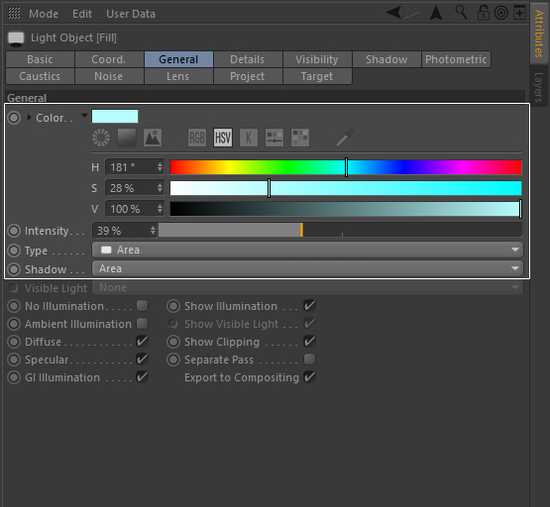
We have created our light with the "sun's color" (the Key light), now let's recreate the "sky light" with the Fill light. This will result in a light-blue color, with 39% of intensity, as shown below:

The last light we will add to complete the Three-Point lighting is the Back light. Because my object and my camera are so close to the floor, I will position the light on the very top of the object so the reflection of the light is not visible in the back part of the ground. Moreover, I changed its name from Back to Top (T) for more accurate naming. The purpose of this light is to aid in separating the important object from the background by creating a small outline on the edges of the object. However, this outline will be covered by other techniques later on. Note that this light can also be blue and a little brighter than the past one, as we are still resembling the sky's color.
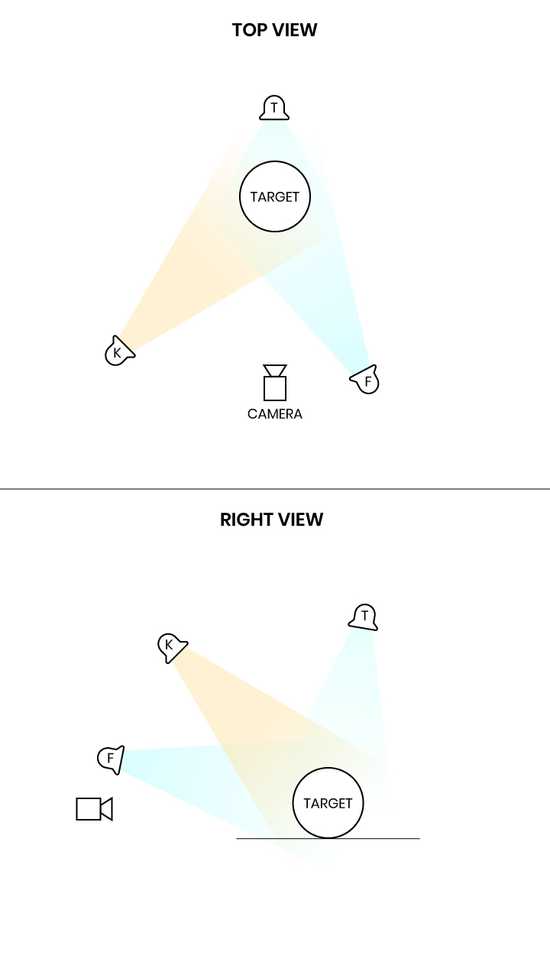
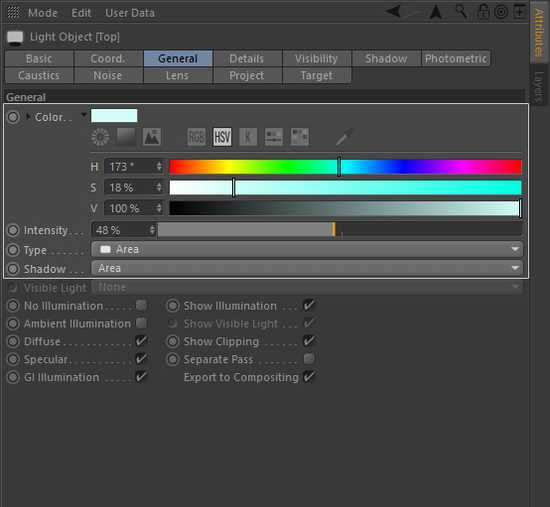

Now that we have finished positioning the three basic lights, let's see how they look together!
 Three-Point Lighting Technique in Cinema 4D
I hope you can see the huge quality difference. Compared to the first render, we now have different values, color gradient, and a much more appealing image. Of course, Three-Point Lighting will not always be enough to create realistic scenes in a 3D environment, but they are a good way to start. I will show you more lighting techniques you can use for your scenes.
 Comparison between Global Illumination and Three-Point Lighting
STEP 5: Adding Rim Lights
A useful option to add more depth and color gradient to your objects is to use Rim lights. They behave like the Back light, but mainly from the sides. There is no rule for how many Rim lights you should use, but between one or two will be enough. However, sometimes I use up to three or four, to give more depth to the sides (R.L).
From the setup that we already have, let's add one more light and place it to one side. We will place the first light on the left side, a little bit below the Key light. Normally, I play with the colors of these lights until I find one that I like. For this scene, I chose red. Do not forget to watch out for the intensity!
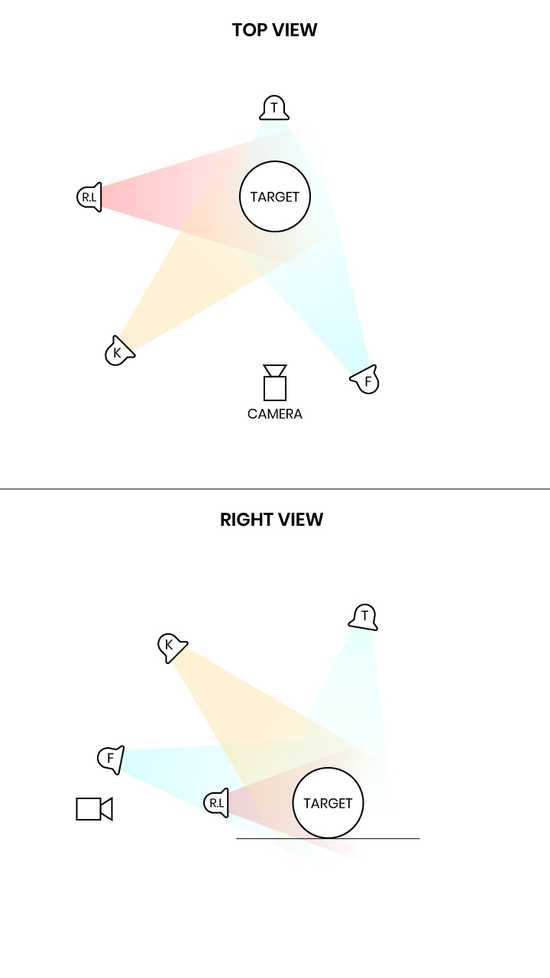
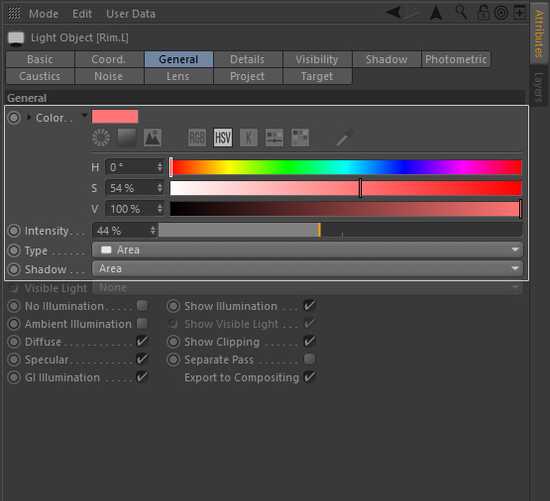

And now, the second Rim light that is to be positioned on the other side. I chose purple for this one (R.R):
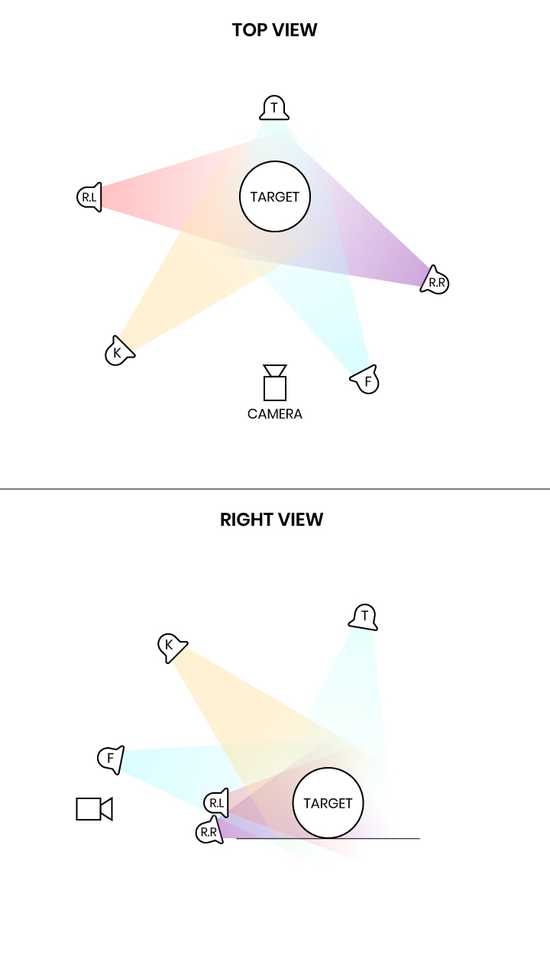
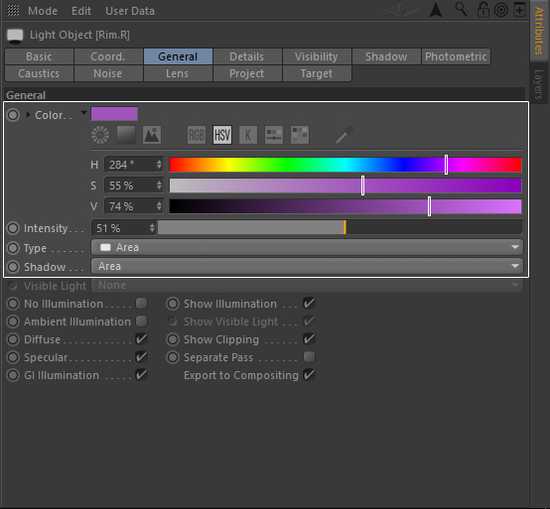

 Both Rim Lights Put Together
Lastly, let's see how they look among the basic Three-Point Lighting technique:
 Three-Point Lighting and Rim Lights
Using Rims lights is also a big improvement in our render. With each iteration, the model looks less dull as it looked in the beginning. We have added a lot of depth and color variations, and we are building a more appealing picture. However, there are still a few steps left to achieve an amazing render image.
STEP 6: Specular Control
One of the things our model still lacks is a more clear and visible value gradient. This is where 3D lights become very useful (compared to all the downfalls I have already covered). For example, Cinema 4D lets us add another light that only affects the specular, without impacting the diffuse (and vice versa).
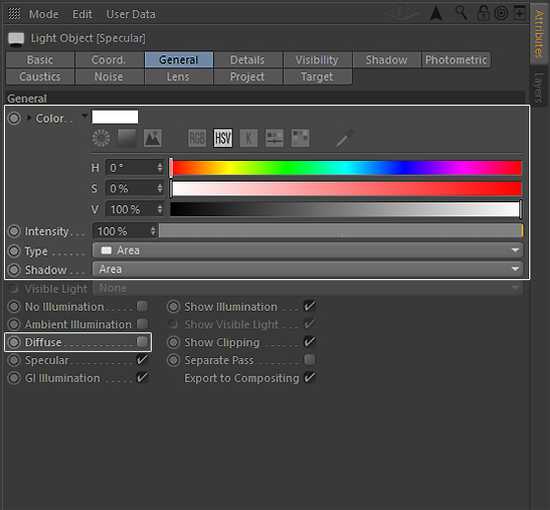
To do it is very simple. Copy and paste your Key light, so it stays in the same place. Then, change its name to "Specular", turn its color to white and its intensity to 100% (though, remember you can increase or decrease it whenever you see fit). You can also make it smaller than the Key light, so it does not affect a large area when you have reflective materials. Afterwards, the little option that does the trick is unchecking "Diffuse":
Finally, test the scene with only the Specular light turned on:

And with all the lights turned on:
 Three-Point Lighting, Rims and Specular
As you can see, adding a Specular light is a major improvement to our image. Keep in mind that you can change the Specular's color to whatever color you like, as well as its intensity, position, etc. Usually, in real-world objects, all speculars or highlights go to white, but because we are dealing with CG rendering, we can be as free and creative as we want. In the image below, there is a quick example I did getting the intensity up and changing the color to a light yellow:
 Harsh and Unnatural Specular in Cinema 4D
STEP 7: Ambient Illumination
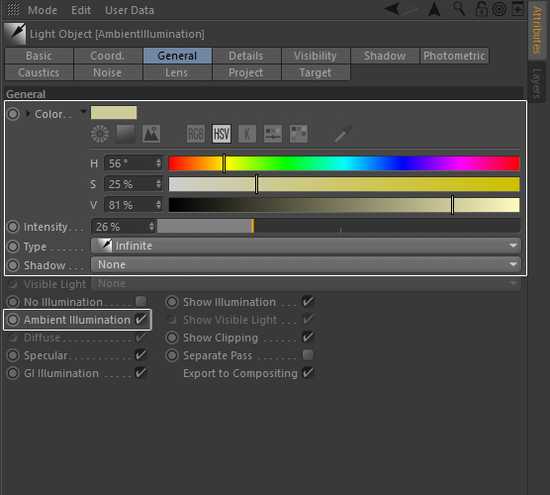
Another nice trick you can use whenever you want to do a little color correction or brighten up the scene is to add an Ambient Illumination light. Generally, I would use this light when trying to achieve a cartoonish look on my render, but it is also a great way to fix dark shadows and a lack of color.
To do this, simply add a new light, but this time it should be an Infinite Light. For how this scene is already built, I will place it the same way as the camera. This light does not have to be in range from the object to illuminate properly because it is an Infinite light: it goes on forever.
For this light, the little trick is in checking "Ambient Illumination" on. After that, you can have fun using it! Consider that this light could wash out all of the other colors we have already been working so hard on, so use it with precaution.
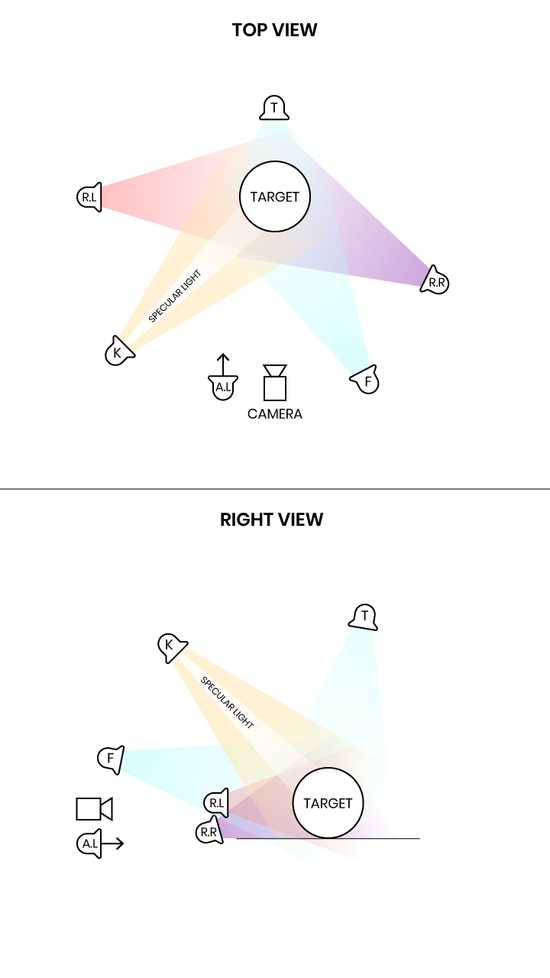
To illustrate the nice addition of this option, take a look at these images:
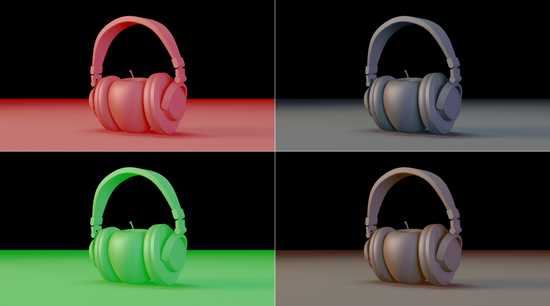 Examples of different Ambient Illumination Parameters
For this particular example, I believe something like a greyish-yellow with low intensity will work better:
 Three-Point, Rims, Specular and Ambient Illumination put together
STEP 8: Shadow Casters in Cinema 4D
A problem that presented itself when we added the Ambient Illumination is that the object seems to be floating a little bit because its shadows do not seem to "hold it". This is a major conflict that has to be solved. We have seen the benefits of real-life lights, as well as the advantages of fake CG lights. One thing that real lights cannot do, but 3D lights can, is cast shadows without emitting a light. So, let's add one!
Create a new Spotlight, name it "ShadowCaster" (SC), and give it the Target Object tag. Naturally, this one should be in the same place as the Key light, but the shadow would look too stretched and odd. Ultimately, we only need a light that supports the 3D object by making a nice bottom shadow. A Shadow Caster on top of the object shall do it, so it projects a shadow only on the ground. With that being said, place the light on the very top of the object, just like the Top light we created earlier.
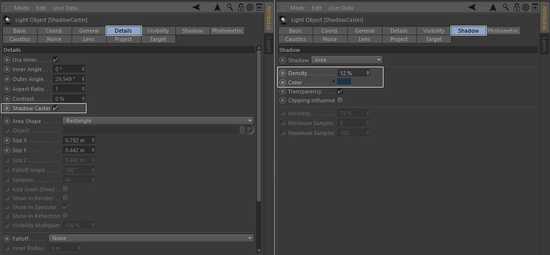
Select the Shadow Caster and under its attributes go to "Details". Turn on "Shadow Caster". Now, to modify the parameters of the shadow it creates, you have to open another tab called "Shadow". Here, you can play around with the values it provides you. If you are still unhappy with the result, consider moving the Shadow Caster a little bit to see how it affects your scene.
The results of adding a Shadow Caster to the scene are more stable and depthful shadows, that do hold the object to the ground:
 Three-Point, Rims, Specular, Ambient Illumination and Shadow Caster
The Shadow Caster allows us to make stronger shadows and bring stability to our image. Of course, it is not necessary for every single case, but it is good to have it whenever it is needed.
NOTE: You can also edit the shadows the other lights emit. To do this, go into the same panel within your light's Attributes, search for "Shadow", and here you can edit the color of the shadow it emits and its density.
STEP 9: Finishing Up
Now that you know some tricks, we can start finishing up the scene. First, let's keep the material of the model and make a new one for the floor so we can separate them. I will change the color for the new material of the floor to a dark blue. Don't forget to name them so we can keep everything organized!
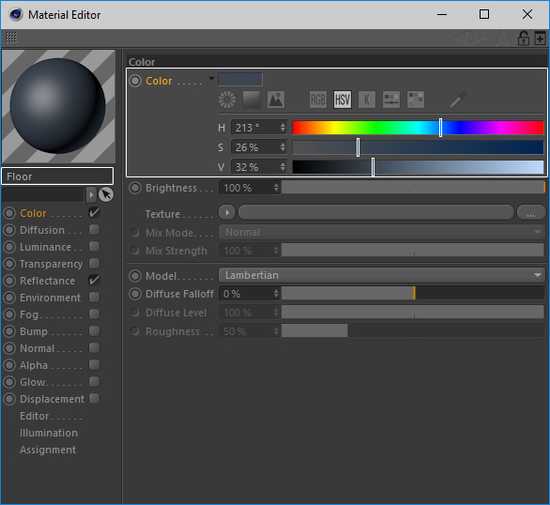
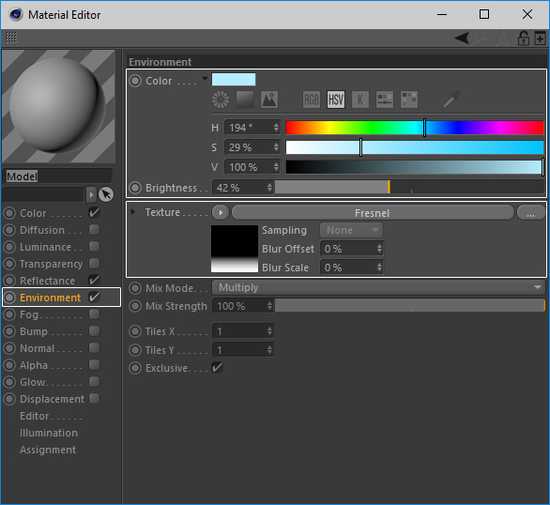
Although this tutorial is not about materials, there is an option we could use to get more contrast out of the model. Naturally, this may not be possible for every single case. With that in mind, open the material you are using for the model you want to bring up the contrast. Within this window, activate the "Environment" option, and for "Texture" select "Fresnel". If you hit render, the results may be too harsh:

As you can see, this trick helps us to draw an outline on all of our object's surface. Definitely, the result from above is not what we would like. In order to change this, you can manipulate the Fresnel's gradient. You can also change the color in the Environment's color attribute.
Render, and see how it looks with and without the "Environment" option:
 Outlining the Model with the Environment Option in the Material
Pretty neat, eh? But keep in mind that this effect might work best when used for an object that does not have a floor or that is floating, as it separates the actual object from its shadows.
Finally, you are not forced into using only one Key light or Fill light, nor in replicating the same colors I used. For example, whenever I have reached a good base for my image, I experiment on the colors and the light's positions. Play around with your setup a little bit!
After experimenting a littl bit myself, this is the result I like the most:
 Final Render Image in Cinema 4D for this Tutorial
To achieve this particular result, I added an Environment object (different from the Environment option of a material) with Fog enabled to match the floor with the background. I also added some Volumetric lights behind the object, and overall: I played with the current setup!
CONCLUSION
The result looks very nice, but there are still a lot of post-processing effects that we can add to make it even better. Changing the little things in 3D can be tedious and very slow (if you have a complex scene going on). In the second part of this tutorial, I am going to show you some techniques to improve your renders with a little bit of post-processing or post-editing in Photoshop, plus using multiple passes of your render.
To wrap up this tutorial, let's talk about some FAQs:
What about Materials?
If you now place the original materials to your objects and render, you may see they don't fit the scene's light setup. My advice would be that you setup all your lights and materials together. Work them at the same time and modify them accordingly. Remember that, like lighting, 3D materials don't have the limitations of real ones, and you can get very creative with them (though, they also have their constraints). Look at how the final render looks with the original materials:
 Final Render with the Original Materials
I hope you have enjoyed this tutorial! Feel free to contact us if you have any questions.

Written by Santiago Degetau


